Triển khai GlusterFS trên UbuntuServer18LTS
Triển khai GlusterFS trên UbuntuServer18LTS
1./ Tìm hiểu GlusterFS
Glusterfs is a scalable network filesystem with capabilities of scaling to several petabytes and handling thousands of clients. It's an open source and distributed file system that sets disk storage resources from multiple servers into a single namespace. It's suitable for data-intensive tasks such as cloud storage and data media streaming.
In this tutorial, I will show how to set up a high availability storage server with GlusterFS on Ubuntu 18.04 LTS (Bionic Beaver). We will use 3 ubuntu servers, 1 server as a client, and 2 others as a storage. Each storage server will be a mirror of the other, and files will be replicated across both storage servers.
Can scale to several petabytes thus can handle thousands of clients.
Provides high availability through data mirroring. It also supports self healing mechanism that restores data to the correct state following recovery with nearly no overhead.
Provides a unified global namespace that clusters disk and memory resources into a single pool that ensures load balanced I/O.
Uses elastic hash algorithm to locate data in the storage pool hence linear performance scaling.
Provides elastic volume manager in which data is stored in logical volumes that are abstracted from the hardware and logically partitioned from each other. This ensures that storage can be added or removed while data continues to be online with no application interruption.
Gluster is fully POSIX-compliant and does not require any unique APIs for data access.
Supports industry standard protocols like NFS, SMB, CIFS, HTTP and FTP.
2./ Cấu trúc Volume của GlusterFS
Trước tiên cần tìm hiểu cấu trúc Volume muốn cài
Distributed Glusterfs Volume

Replicated Glusterfs Volume

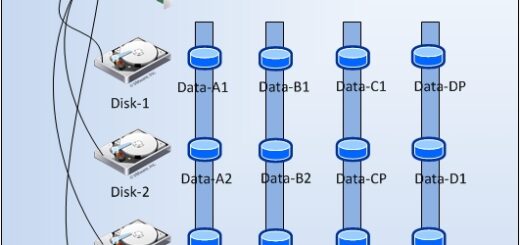
Distributed Replicated Glusterfs Volume

Striped Glusterfs Volume

Distributed Striped Glusterfs Volume

Replicated stripe volume
Kết hợp từ replicated và stripe

3./ Cài đặt GlusterFS trên Ubuntu 18
3.1/ Mô hình

3.2/ Loại Volume: Replicated Glusterfs Volume
https://www.howtoforge.com/tutorial/high-availability-storage-with-glusterfs-on-ubuntu-1804/
Trên cả 2 Node
nano /etc/hosts
10.0.1.42 svr042_Storage01
10.0.1.43 svr043_Storage02
sudo apt install software-properties-common -y
Add the glusterfs key and repository by running commands below.
mkdir -p cd /opt/setup
wget -O- https://download.gluster.org/pub/gluster/glusterfs/3.12/rsa.pub | apt-key add -
sudo add-apt-repository ppa:gluster/glusterfs-3.12
sudo apt install glusterfs-server -y
sudo systemctl start glusterd
sudo systemctl enable glusterd
3.3/ Tạo Trusted Storage Pool
Từ Node1 add Node2 vào GlusterFS Storage Pool
gluster peer probe 10.0.1.43

check lại
gluster peer status
gluster pool list
root@svr042_Storage01:/opt/setup# gluster peer status
Number of Peers: 1
Hostname: 10.0.1.43
Uuid: 5f505b0c-14e4-4458-bb2d-d00e25d1a9bf
State: Peer in Cluster (Connected)
root@svr042_Storage01:/opt/setup# gluster pool list
UUID Hostname State
5f505b0c-14e4-4458-bb2d-d00e25d1a9bf 10.0.1.43 Connected
772020bb-6b81-4b44-80c9-06c6c3181f96 localhost Connected
3.4/ Tạo Folder Share Replicate
Tạo trên cả 2 server Folder Share Replicate
mkdir -p /opt/glusterfs/distributed
Trên Node1: Cấu hình tạo GlusterFS volume:
gluster volume create vol01 replica 2 transport tcp \
10.0.1.42:/opt/glusterfs/distributed \
10.0.1.43:/opt/glusterfs/distributed \
force
#Kết quả
root@svr042_Storage01:/opt/setup# gluster volume create vol01 replica 2 transport tcp \
> 10.0.1.42:/opt/glusterfs/distributed \
> 10.0.1.43:/opt/glusterfs/distributed \
> force
volume create: vol01: success: please start the volume to access data
Như vậy đã tạo xong Distributed Volume vol01. Tiến hành Start vol01. chỉ cần thao tác trên Node1
gluster volume start vol01
gluster volume info vol01
#Kết quả
root@svr042_Storage01:/opt/setup# gluster volume start vol01
volume start: vol01: success
root@svr042_Storage01:/opt/setup# gluster volume info vol01
Volume Name: vol01
Type: Replicate
Volume ID: 2d7738dd-2c11-4edd-835f-3a6b5e7353af
Status: Started
Snapshot Count: 0
Number of Bricks: 1 x 2 = 2
Transport-type: tcp
Bricks:
Brick1: 10.0.1.42:/opt/glusterfs/distributed
Brick2: 10.0.1.43:/opt/glusterfs/distributed
Options Reconfigured:
transport.address-family: inet
nfs.disable: on
performance.client-io-threads: off
#
root@svr043_Storage02:/opt/glusterfs/distributed# gluster volume info vol01
Volume Name: vol01
Type: Replicate
Volume ID: 2d7738dd-2c11-4edd-835f-3a6b5e7353af
Status: Started
Snapshot Count: 0
Number of Bricks: 1 x 2 = 2
Transport-type: tcp
Bricks:
Brick1: 10.0.1.42:/opt/glusterfs/distributed
Brick2: 10.0.1.43:/opt/glusterfs/distributed
Options Reconfigured:
transport.address-family: inet
nfs.disable: on
performance.client-io-threads: off
4./ Cài đặt GlusterFS client
Cài trên cả 2 node1 và node2
sudo apt install glusterfs-client -y
mkdir -p /opt/replicate
sudo mount -t glusterfs 10.0.1.42:/vol01 /opt/replicate
#
root@svr042_Storage01:/opt/glusterfs/distributed/.glusterfs# df -h
Filesystem Size Used Avail Use% Mounted on
udev 1.9G 0 1.9G 0% /dev
tmpfs 395M 1.1M 394M 1% /run
/dev/sda4 93G 5.5G 82G 7% /
tmpfs 2.0G 0 2.0G 0% /dev/shm
tmpfs 5.0M 0 5.0M 0% /run/lock
tmpfs 2.0G 0 2.0G 0% /sys/fs/cgroup
/dev/loop0 100M 100M 0 100% /snap/core/11420
/dev/loop1 100M 100M 0 100% /snap/core/11606
/dev/sda2 2.0G 81M 1.8G 5% /boot
tmpfs 395M 0 395M 0% /run/user/0
10.0.1.42:/vol01 93G 7.1G 82G 9% /opt/replicate
Tiến hành Mount khi khởi động
nano /etc/fstab
#Node1:
10.0.1.42:/vol01 /opt/replicate glusterfs defaults,_netdev 0 0
#Node2:
10.0.1.43:/vol01 /opt/replicate glusterfs defaults,_netdev 0 0
5./ Test Replicate/Mirroring
Khởi động lại cả 2 Node1 và Node2


Để cho nhiều Folder có thể replicate giữa 2 server có thể tạo softlink hay còn gọi là symbolic link
ví dụ cấu hình cho haproxy
cấu hình trên Node1
mv /etc/haproxy /opt/replicate/haproxy
cd /etc/
ln -s /opt/replicate/haproxy .
ll /etc/haproxy
#
root@svr042_Storage01:/etc# ll /etc/haproxy
lrwxrwxrwx 1 root root 23 Aug 27 15:26 /etc/haproxy -> /opt/replicate/haproxy/
Trên Node 2
Sau khi cài xong haproxy
xoá sạch thư mục /etc/haproxy
mv /etc/haproxy/ /opt/bk
#Kiểm tra thư mục haproxy đã được đồng bộ sang từ node1
root@svr043_Storage02:/opt/replicate# du -sh /opt/replicate/haproxy/
522K /opt/replicate/haproxy/
tạo Softlink
cd /etc/
ln -s /opt/replicate/haproxy .
#Kết quả
root@svr043_Storage02:/etc# ll /etc/haproxy
lrwxrwxrwx 1 root root 22 Aug 27 15:31 /etc/haproxy -> /opt/replicate/haproxy/
Như vậy là thành công
6./ Tham khảo
https://fixloinhanh.com
https://www.howtoforge.com/tutorial/high-availability-storage-with-glusterfs-on-ubuntu-1804/
# https://github.com/hocchudong/ghichep-glusterFS
# https://kifarunix.com/install-and-setup-glusterfs-on-ubuntu-18-04/