Phần 15 Cài đặt Keepalived MongoDB
Phần 15 Cài đặt Keepalived MongoDB
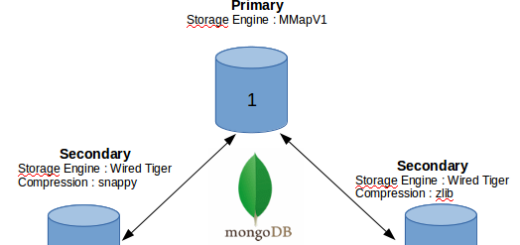
1./ Mô hình có 3 node

Thực tế thì node Arbiter không lưu dữ liệu, nhưng ở đây mô hình sẽ có 2 node secondary 1 node Primary
cfg = rs.conf()
cfg.members[0].priority = 3
cfg.members[1].priority = 2
cfg.members[2].priority = 1
rs.reconfig(cfg)
Triển khai Keepalived trên node members 0 và node members 1 bởi 2 node trên có priority cao nhất
2./ Cài đặt Keepalived
Trên cả 2 node 0 và 1
apt install keepalived
sed -i 's/#net.ipv4.ip_forward=1/net.ipv4.ip_forward=1/' /etc/sysctl.conf
echo "net.ipv4.ip_nonlocal_bind = 1" >> /etc/sysctl.conf
Tạo mới 1 file config keepalived để cấu hình trên cả 2 node như nhau:
nano /etc/keepalived/keepalived.conf
#
! Configuration File for keepalived
global_defs {
router_id MONGODB_DB-HA
}
# Define the script used to check if mongod is running
vrrp_script chk_mongod {
script "killall -0 mongod"
interval 2 # every two seconds
weight 2
}
# Define the script to see if the local node is the primary
vrrp_script chk_mongo_primary {
script "/etc/keepalived/ck_mongo_master"
interval 2 # every two seconds
weight 2
}
vrrp_instance VI_2 {
state BACKUP
interface eth0
virtual_router_id 50
priority 103
advert_int 1
authentication {
auth_type PASS
auth_pass test1232222
}
virtual_ipaddress {
10.0.2.30
}
track_script {
chk_mongod
chk_mongo_primary
}
}
#Neu khong chmod se bi loi Configuration file '/etc/keepalived/keepalived.conf' is not a regular non-executable file
chmod 644 /etc/keepalived/keepalived.conf
#
nano /etc/keepalived/ck_mongo_master
#
#!/bin/bash
ISMASTER=$(/usr/bin/mongo -host 127.0.0.1 --quiet --eval ‘db.isMaster().ismaster’)
if [ $ISMASTER == ‘true’ ]; then
exit 0
else
exit 1
fi
#############
chmod +x /etc/keepalived/ck_mongo_master
systemctl restart keepalived
systemctl enable keepalived
3./ Test
trên node master là server 0
systemctl stop mongodb
sau khoảng 2s ip VIP 10.0.2.30 sẽ tự chuyển sang server 1
trên node master bật mongodb
systemctl start mongodb
sau 1 khoảng thời gian sync dữ liệu từ các node 2 và node 3 sang node 1 thì vIP sẽ tự chuyển lại sang node 1
4./ Bonut
Nếu có nhiều hơn 2 node thì có thể cài keep alived ở trên tất cả các node
5./ Tham khảo
https://medium.com/@azsecured/mongodb-primary-failover-with-keepalived-with-mongodb-cluster-3462469a9730